za
za global
 us
us me
me uk
uk bel
bel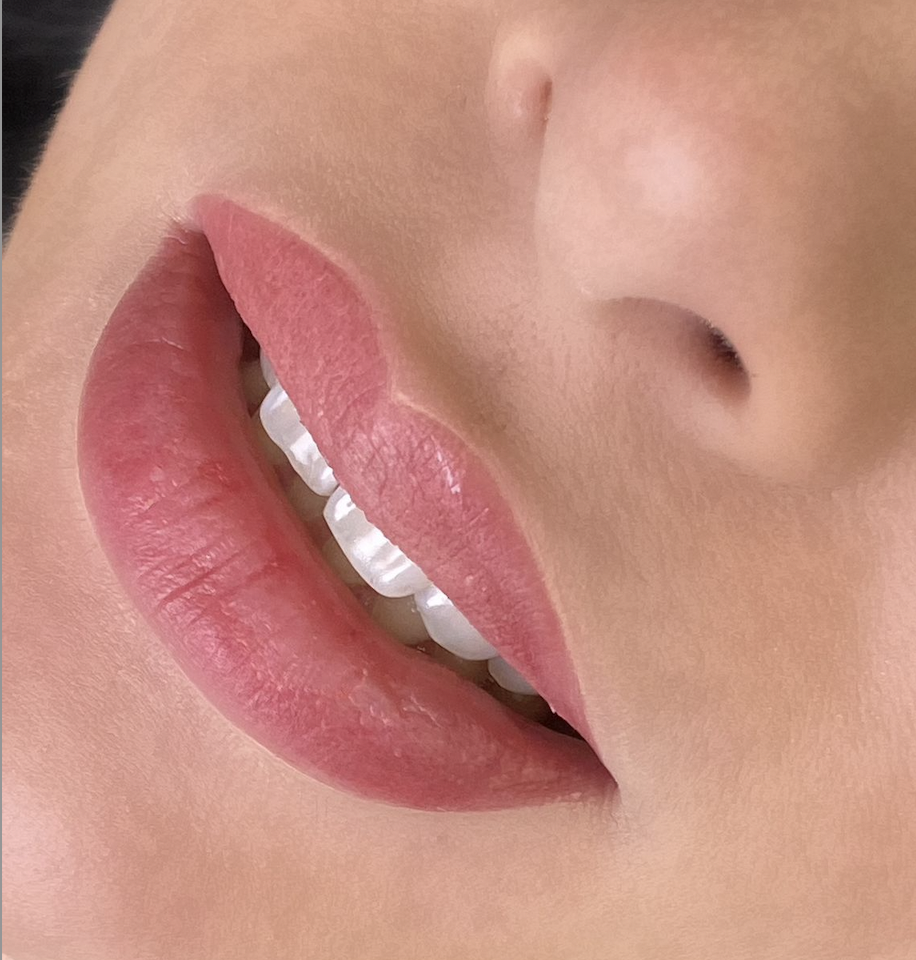
HOW TO CREATE STUNNING PMU LIPS FOR THE PARTY SEASON
As Christmas approaches, there is a significant increase in demand for PMU treatments, as everyone wants to look their very best for the party season. Creating beautiful PMU Lips involves careful planning, precision, and attention to detail.
Here Monika Ludwiczak, the Queen of PMU and Co-Founder of Everlasting Brows shares her Top Tips on how to create stunning PMU Lips for the party season.
1. THE PMU LIP CONSULTATION
The consultation process is the ideal time to gather information about your client’s medical history, understand their preferences and explain the treatment process. It is important to manage your clients’ expectations during this time. It is absolutely crucial to explain that multiple procedures might be required to achieve the desired effect, that way your clients will not be disappointed if they don’t see their goal achieved after just one session. This is especially important if your clients have very cool or dark lips, then 3 and sometimes even 4 sessions will be required.
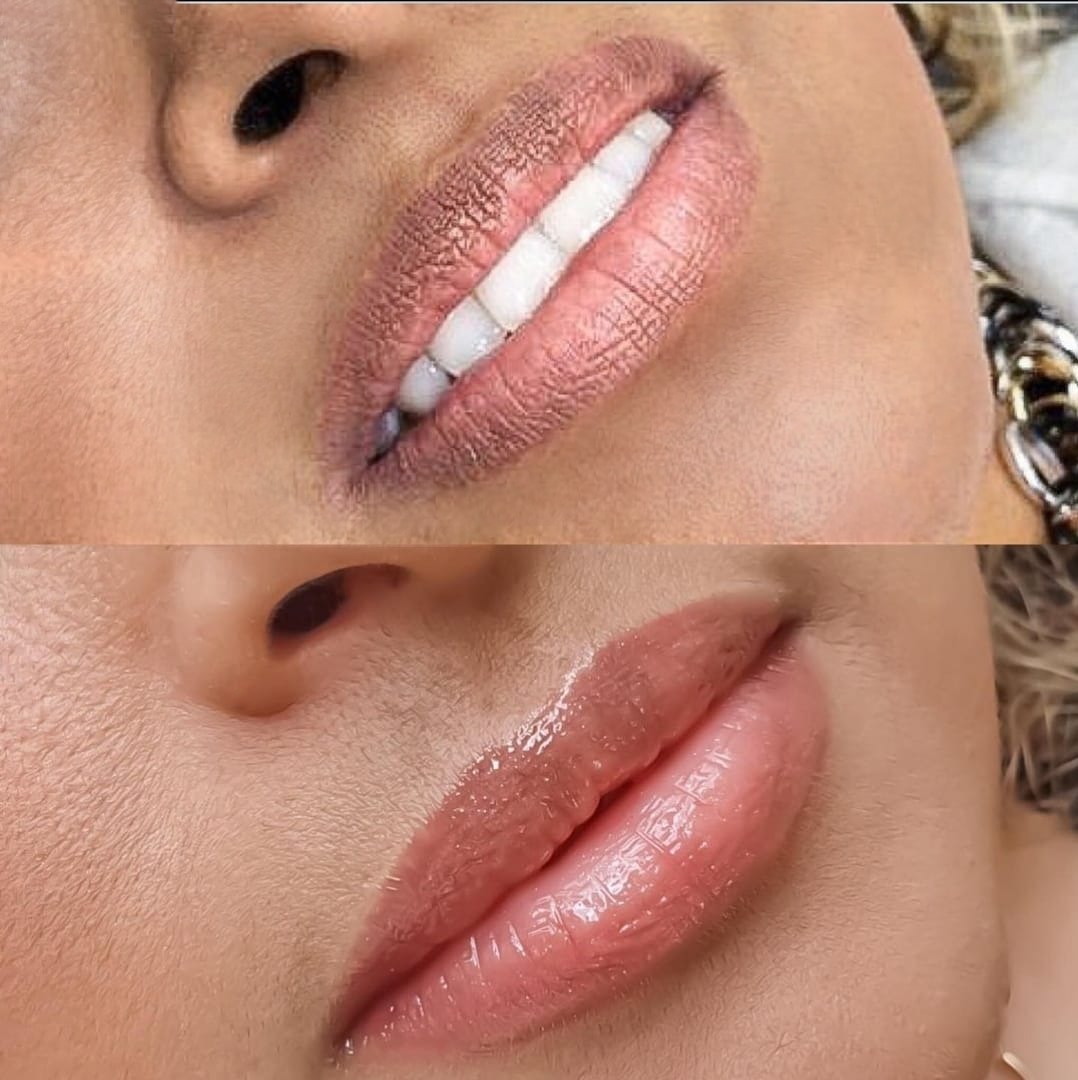
2. TAKING GOOD BEFORE & AFTER PICTURES
It is important to take good before and after pictures of your client in the same setting to allow the makeover to fully stand out. You need to ensure that the light conditions and client's position are the same in both scenarios, but also preferably you will be taking your client’s photo prior to the application of any numbing solution. That way you will be able to see the client’s natural lip colour much better and will avoid a dramatic before and after photo that can scare some clients, lips after numbing become very pale vs the finished procedure when the lips are usually quite bright.
3. THE PMU LIP DESIGN
Next step is the predraw. Your end results largely depend on this step as a good design is the most vital part of PMU Lips. Start with lip mapping to ensure you have the key points of the lips marked and then draw the shape with small, smooth movements, making sure you don’t have any sharp points - as rounder, softer lips always look the most natural. I usually check the predraw by asking my clients to lift the chin up and down, that way I can see and compare inner corners and the curve on both sides of the upper lip. It helps me to create perfectly symmetrical results every time. For experts, you might want to try mixing 3 parts of numbing with 1 part of lip balm and 1 part of pigment and pre-draw whilst numbing!
4. THE PMU LIP PIGMENT CHOICE
It important to understand how your client wants their lips to heal and work with a pigment colour that can achieve that. Be sure to make your client aware that their lips can look much brighter and bigger due to the swelling immediately after the procedure. This effect has nothing to do with the final results and shouldn’t make your clients worried if you tell them in advance that this is to be expected, and an absolutely normal skin reaction. When picking the colour you need to take into consideration the amount of pigment that the natural lips have and the temperature of the natural lips. Most lips would be neutral or cool so the best colour choices would be neutral to warm, you don’t want to be adding extra coolness to already cool lips as it can make them look dimensionless and unhealthy. The best and safest tones are nude pink, soft pink and peach.
5. THE STRETCH
Regardless of the look you are trying to achieve or the technique chosen, a proper stretch is a must, it helps you work more efficiently, minimise the skin trauma and makes you clients feel at ease as a good stretch also minimises the discomfort that your client may feel. There are many stretching techniques, but I find that stretching small sections is more comfortable for me and since I work in small sections anyway, covering one area before moving onto the next one works the best for me. Making sure you are stretching in order to make the area as flat as possible is my best advice, as this will speed up pigment implantation and procedure time and minimise swelling, which is a ‘win win’ situation. Sometimes stretching is more difficult on certain lip shapes or lips with fillers so you will need to adjust your techniques accordingly to suit each client type.
6. THE PMU LIP TECHNIQUE
Working methodically and in small sections usually helps to achieve very uniform results and a better overall healed effect. Make sure your hand movement is steady, you can use a different machine speed for the contour and different for the passes, but you should always complete the full pass with one speed to avoid patchy results. To complete the contour a forward backward soft movement is the best and for the shading a pendulum or sweeping technique is the best. When shading it is very important that your device is not leaning to one side too much as that can create a stripy effect where there is a stronger pigmentation - where the pigmentation was overlapping. All lip pigmentation should always be carried out with a gentle pressure, trying to push the pigment deeper will only result in a bigger skin trauma not better results.
7. THE NUMBING PROCEDURE
Prenumbing the lips is highly recommended as the procedure can take a couple of hours or even longer and you want to make sure that your clients are comfortable and not fidgeting in the chair whilst you are trying to work. It is normal to feel a certain level of discomfort and your clients should be prepared for that - there is really no such thing as a pain free experience - there is always a mild pain involved. We can also experience some issues with over numbing of the skin - every time you apply the numbing solution the skin turns white and it seems like there is no pigmentation, artist’s often end up overworking the area and once they finish the procedure and the healthy blood flow finally returns to the area, the lips look too dark and intense, which is not great for your before and after photos. Try to always use everything in moderation - and if you find that your procedures are too long or causing a lot of pain to your customers, try to adjust your pressure or switch to a cartridge that will create more pigment saturation faster.
8. PMU LIP AFTERCARE
It is vital that you instruct your client on proper aftercare, afterall healed results on PMU Lips depend on both the skill of the artist and how well the client follows the aftercare advice. Good aftercare includes using our provided after care sachets, using a straw when drinking, avoiding excessing sweating and even kissing. Restrictions normally only last for up to 10 days during the healing process.
So, what are you waiting for? Create stunning PMU Lips for the Party Season with Everlasting Brows range of gorgeous Lip pigments.
We Love…
Everlasting Brows PMU Lip Pigment in Valentino:
https://everlastingbrows.com/uk/valentino-10ml-pmu-microblading-lip-pigment.html
Everlasting Brows PMU Lip Pigment in Pucci:
https://everlastingbrows.com/uk/pucci-10ml-pmu-microblading-lip-pigment.html
Everlasting Brows PMU Lip Pigment in Dior:
https://everlastingbrows.com/uk/dior-10ml-pmu-microblading-lip-pigment.html
Everlasting Brows PMU Lip Pigment in McQueen:
https://everlastingbrows.com/uk/mcqueen-10ml-pmu-microblading-lip-pigment.html